
Terrain lighting and shading
Set ambient light and the sun's azimuth, altitude and intensity, cast shadows, switch between smooth and flat shading, and see unlit colours.
You will learn
- Position the sun and set light intensities.
- Cast shadows and understand their limits.
- Choose smooth or flat shading.
- Turn lighting off to see exact colours.
Prerequisites
Data for this tutorial
Nanda Devi massif, SRTM (real terrain) Download nanda-devi-srtm-1arcsec.tif
- Format
- GeoTIFF, 1 band, Int16, Deflate, tiled
- CRS
- EPSG:4326 (WGS 84, longitude/latitude)
- Content
- Elevations 2285 to 7801 m above the EGM96 geoid; lon 79.7276 to 79.9776, lat 30.2279 to 30.4779
- In Orbis3D
- Data panel ▸ Sample data ▸ Nanda Devi massif, SRTM (real terrain) ▸ Load
- Licence
- SRTM 1 arc-second, NASA/USGS, public domain
Synthetic samples are CC0 1.0; the SRTM sample is public domain. About the datasets
The task
You want a dramatic view of Nanda Devi in low evening light with long shadows, for a poster.
Two kinds of shading
Orbis3D shades terrain in two independent ways:
- 3D lighting (Scene ▸ Lighting): a sun and an ambient light shine on the mesh in real time. It changes as you set the sun and can cast shadows.
- Hillshade blend (Surface ▸ Hillshade): a computed hillshade image is multiplied into the colours. It is part of the colours, so it also appears in unlit views and exported textures.
Steps
- Load Nanda Devi massif and open the Scene tab.
- In Lighting, keep Light the terrain ticked.
- Set Sun azimuth (the direction the light comes from, clockwise from north): 315° is north-west, the usual cartographic convention; 270° is west, for evening light.
- Lower Sun altitude to about 18°. The lower the sun, the longer the shadows and the stronger the relief.
- Tick Cast shadows. Ridges now throw shadows into the valleys.
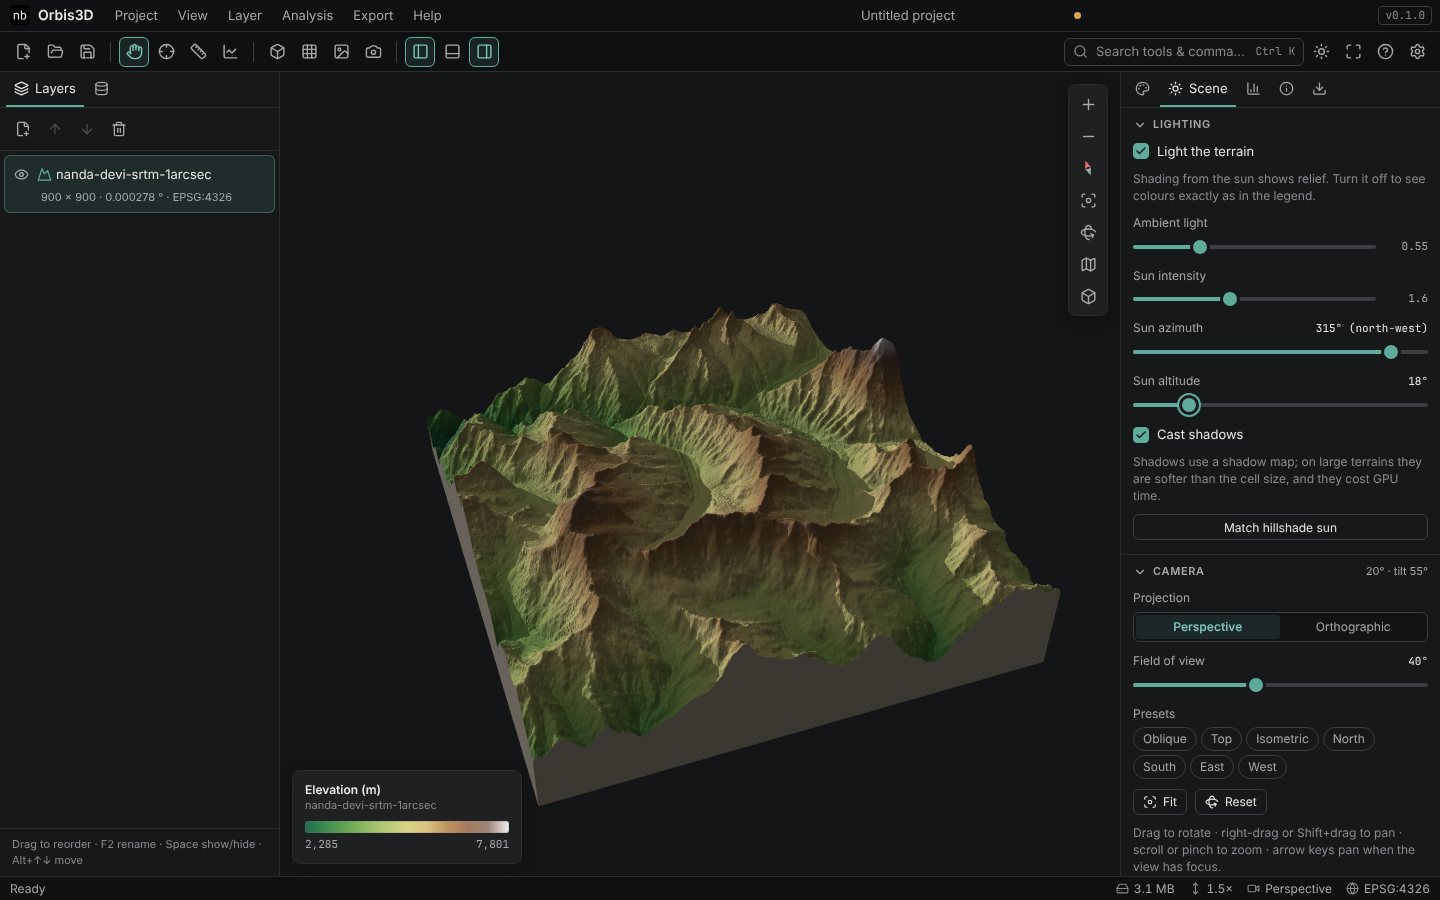
- Balance Ambient light (light from the whole sky, 0.55 by default) and Sun intensity (1.6 by default). Less ambient light gives deeper shadows.
- Click Match hillshade sun to give the 3D light the same direction as the layer's hillshade, so both kinds of shading agree.
Smooth or flat shading
In Scene ▸ Rendering ▸ Shading:
- Smooth interpolates the light across each triangle; the surface looks continuous.
- Flat gives each triangle one tone, so the mesh looks faceted. It is useful to see the mesh resolution, together with the wireframe.
Unlit terrain
Clear Light the terrain to switch the 3D lighting off. Colours are then shown exactly as computed, and with the hillshade blend set to Off they match the legend exactly. Use this for maps of classes where the colour must be read.
## Expected resultA low north-western sun with long shadows across the glaciated valleys of the massif.
Common mistakes
- Colours look darker than the legend. That is the lighting. Turn it off, or raise the ambient light.
- No shadows. Shadows need Light the terrain on. A sun high overhead also casts very short shadows.